
Mastering WordPress Website Creation: Your Step-by-Step Tutorial with WP Engine
Are you eager to launch your own WordPress website with ease? Look no further! WordPress is the go-to choice for its user-friendly interface, robust functionality, and limitless customization options. Whether you’re a tech-savvy pro or a beginner with internet basics, WordPress empowers you to create any type of website, from e-commerce platforms to online communities and beyond.
But before you embark on your WordPress journey, one crucial question remains: Where should you host your website?
Enter the world of WordPress hosting companies, each vying for your attention. Selecting the right hosting provider is as vital as choosing your website’s niche and name. A well-chosen host ensures your site performs at its best, with enhanced SEO, increased traffic, and fortified security against potential threats. In essence, a reliable hosting service becomes the guardian of your online business or website, safeguarding it from the latest vulnerabilities and hacking attempts.
Discover the perfect hosting solution that offers a fast and secure environment for your WordPress website, elevating your search engine rankings and providing peace of mind. With the right hosting partner, your online presence can thrive, unlocking endless possibilities for success.
Get ready to unleash the true potential of WordPress and embark on your website-building journey today!
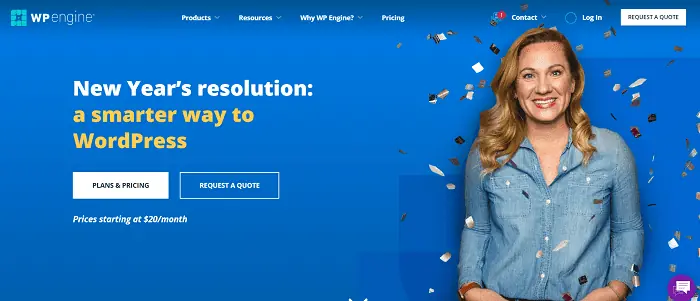
When it comes to WordPress hosting, WP Engine stands out as a trusted industry leader. Established in 2010, WP Engine has earned a stellar reputation for its exceptional hosting services. By hosting websites on high-speed servers, WP Engine ensures lightning-fast content delivery, enabling you to maximize performance and provide an optimal user experience.
With built-in optimization tools and a free CDN integrated into all plans, WP Engine takes your website’s speed and efficiency to new heights. You can focus on developing your business while WP Engine handles the complexities of security and optimization, safeguarding your website from potential threats.
As a WP Engine customer, you’ll receive exclusive benefits. You’ll gain access to the renowned Genesis Framework, along with over 10 StudioPress child themes, all provided at no additional cost. These themes are highly customizable, SEO-friendly, and perfect for any type of website. With complete control over settings and customization, you can effortlessly create a business website, eCommerce portal, or blog without the need for a developer.
WP Engine takes customer support seriously. With their 24/7 fast customer support, assistance is readily available across all hosting plans. Whether you have questions or concerns, WP Engine‘s dedicated support team is there to address your queries and promptly resolve any issues that arise.
Choose WP Engine as your trusted WordPress hosting provider and experience unparalleled performance, security, and support for your website. Take your online presence to the next level and enjoy the peace of mind that comes with partnering with WP Engine.
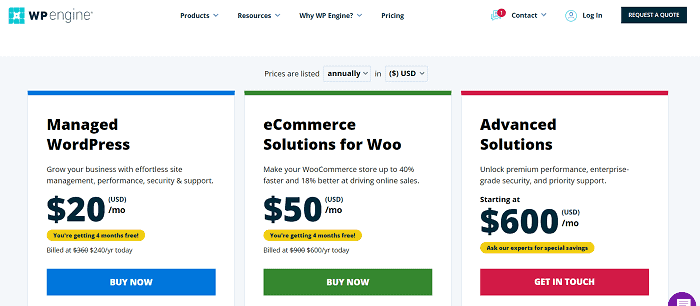
When it comes to managed WordPress hosting, WP Engine offers a range of subscription plans designed to cater to diverse requirements. Let’s explore the four main plans available: Startup, Professional, Growth, and Scale. Additionally, WP Engine provides custom plans for hosting over 30 websites. To benefit from this option, simply reach out to their dedicated customer support, and they will craft a unique plan tailored specifically to your needs.
For those managing multiple websites, WP Engine offers the Professional plan, accommodating up to three websites. With 15 GB of storage and 125 GB of monthly bandwidth, this plan empowers you to handle your diverse web portfolio with ease. If you require hosting for more websites, you can choose from the Growth or Scale plans. The Growth plan enables you to host up to 10 websites with 20 GB of storage, while the Scale plan caters to the needs of users running 30 WordPress websites, offering 50 GB of storage and a substantial 500 GB of monthly bandwidth.
Regardless of the plan you choose, WP Engine ensures that all their hosting packages are brimming with features. Enjoy complimentary SSL certificates, a free CDN, daily backups, advanced security measures, and an array of other enterprise-grade functionalities. Plus, as a WP Engine customer, you’ll receive an exclusive bonus of 10 premium StudioPress themes at no extra cost. This generous offer saves you more than $2000 in theme selections. The renowned Genesis framework, included with these themes, empowers you with unlimited customization options, flexibility, and full control over your website’s design. Trusted by thousands of websites across various niches, it’s an invaluable asset bundled with your subscription.
In addition to their impressive features, WP Engine offers a risk-free period of 60 days. If, for any reason, you’re not fully satisfied with their service, simply cancel your subscription within 60 days to receive a full refund.
WP Engine provides you with flexible billing options, allowing you to choose between monthly or annual plans. Opting for the annual plan not only ensures convenience but also presents a remarkable opportunity to save. By selecting the annual subscription, you’ll receive a generous offer of 4 months of free hosting, translating to savings of at least $120 per year.
To further empower your business website, WP Engine offers additional services that can enhance its performance and reach. Services such as Content Performance, GeoTarget, and WordPress Multisite provide valuable tools to optimize your website’s capabilities. Consider integrating these services to elevate your online presence and unlock new opportunities for success.
Provide Your Contact Information and Account Details
To proceed with setting up your WP Engine account, simply scroll down and fill in the required information. Provide your contact details, choose a suitable account name, and select the preferred data center location.
Global Data Centers for Optimal Performance
WP Engine has strategically positioned data centers across the United States, Australia, Belgium, Canada, Germany, Taiwan, and the UK. If your target audience primarily resides in the United States, selecting the data center in the US will ensure optimal performance. Alternatively, choose the data center closest to the majority of your website visitors for the best user experience.
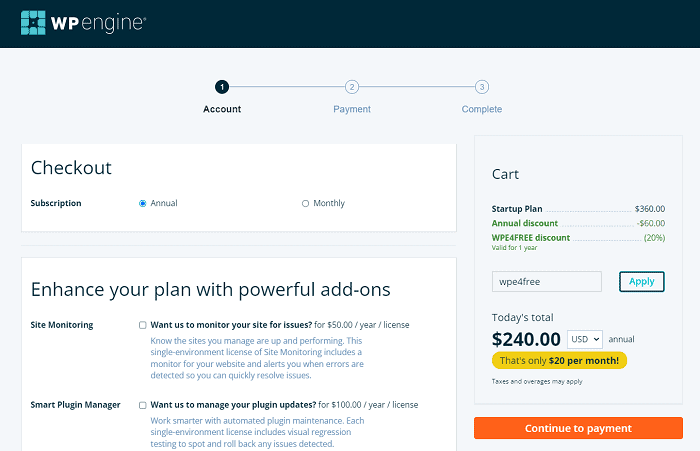
Secure Payment and Confirmation
Next, enter your card details, review and agree to the terms of service, and click on “Continue” to proceed with the payment process. After a brief waiting period, once your payment is approved, you will receive a confirmation receipt on the screen, signifying the successful activation of your WP Engine hosting.
Exclusive Limited Period Deal
Don’t miss out on this opportunity to elevate your website’s performance and save big with WP Engine. Click now to unlock the limited period deal and embark on a hosting journey that guarantees quality, reliability, and outstanding value.
Setting Up WordPress on WP Engine Made Easy
Congratulations on choosing WP Engine for your WordPress hosting needs. Here’s a step-by-step guide to help you get started:
- Check Your Email for Login Details: WP Engine will send a login password to the email address you provided during signup. Retrieve this password and head over to my.wpengine.com. Enter your credentials to log in to the WP Engine platform.
- Navigate to the Install Tab: Once logged in, click on the “Install” tab located at the top of the page. This will allow you to configure your website settings.
- Configure Your Install Name: In the Install section, you’ll find a field labeled “Install name.” Here, you can enter the CNAME record of your site. Simply input the domain name without the extension. Click the “Create Install” button to proceed to the domain overview section.
- Add a Domain for Your Website: On the domain overview page, you can add a domain to your website. WP Engine doesn’t provide domain registration services, so you’ll need to purchase a domain separately from a domain registrar.
- Connect Your Domain: To connect your domain to WP Engine, click the “Enter domain” option at the top of your Install stats. This will display the CNAME record, A record, and primary domain for your account.
- Update Your DNS Records: Access your domain registrar account and navigate to the DNS settings of your domain. Look for the DNS entries with the name/host field containing “@”—these records are for your root domain. Change their value to the IP address displayed in WP Engine‘s domain overview.
- Check the www Entry: In your DNS records, locate the entry for the “www” version of your website. Verify its corresponding value. If it shows “@,” no changes are needed. Otherwise, update it to “@” or the IP address or CNAME record specified in your WP Engine account.
- Set Your Primary Domain: Adjust the TTL (Time To Live) to the minimum setting, which determines how long it takes for changes to propagate. Return to your WP Engine account and find yourwebsitename.com under the “Domains and Redirects” section. Set it as your primary domain.
- Allow Time for DNS Propagation: Be patient as it may take up to 24 hours for the DNS records to update and propagate across the internet. Once the changes have taken effect, you’ll be ready to proceed.
- Start Posting on Your WordPress Website: Using the login credentials provided in the email from WP Engine, you can now access your WordPress website. Log in and start creating and publishing content.